Beyond RNN 這個系列會 focus 在近年來各式各樣我覺得有趣的 RNN 變形,及其相關的實做。
這篇文章的相關程式碼,放在這裡。
最近剛好在學習 PyTorch,便想找個適合的題目來練手,但一昧地 implement 或看論文都有些乏味,希望自己能同時鞏固實做能力又學習新的知識,也因此有了這個系列 - Beyond RNN。
有接觸過 DL 的讀者,想必對 RNN (Recurrent Neural Network) 並不陌生,它主要應用在資料有順序性的 scenerio (e.g 語音,文字,股票走勢(?😛)等等 …),除了 single cell 的變形如 LSTM (Long Short Term Memory) 和 GRU (Gated Recurrent Unit)之外,另外有許多將其 equip 在不同的架構上,強化其功能的延伸。
Introduction
這一篇 Post 會介紹的是 Neural Turing Machine ,是 DeepMind 在 2014 年 所發表的研究。
RNN-type 的 network ,之所以能處理 sequence 的問題,關鍵在它 keep 了 hidden state (對應到 LSTM 的 $h,c$… ),可以理解成當作到目前為止,綜合了所有 input 的 representation ,而其又會隨著新的 input 進來而有所改變。
Motivation
一個很自然的問題是,對於那些很長的 sequence ,我們需要開多大的 hidden state 去 maintain? 直覺應該是 dimension 要更大,可以想成我們要用一條幾千維的 vector 來當 hidden state。
而就像 CNN 的 motivation 一樣,我們希望我們的 model 能引進多一點先備的資訊。在 CNN 中,對於 structured 的影像,直接把每個 pixel 展平成 1D vector 作為 model 的 input,其 performance 比不上將其 treat 成 2D Tensor ,考慮鄰近 pixel 的 額外 information。(工商時間: 這裡有我之前當 TA 時出給同學的練習,在 FER 這個 dataset 上比較 CNN 跟 DNN 的 performance 優劣)
而 NTM 的 idea 也是類似,藉由引進 extra memory ,把原先那個上千維的 1D hidden vector,折成 2D Tensor 作為 memory 。並仿效現在電腦的架構,構造其與 input interact 的 mechanism,把 sequence 先後的資訊給考慮進來。
Basic Structure
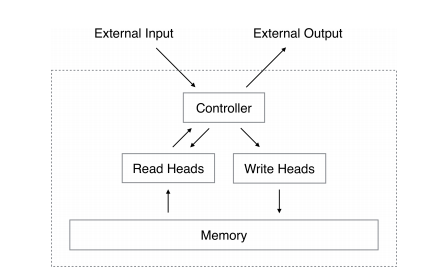
讀寫 memory 這件事分成兩個步驟,內容及位置。\
仔細想想,「位置」在 memory 中,是離散的存在,該如何把從哪裡讀/寫這件事變成可以用 NN 可以 train 呢?\
想法就是讓其可微,這裡的作法是每次在讀寫時,不是對 specific 位置的 memory cell 做操作,而
是對一個 specific distribution $w$ 的 memory cell 們做操作 (簡單來說,就是同時考慮所有
的 memory cell,但根據裡頭內容的不同,決定其所佔的 weight)。
Read & Write
假設時間點 $t$ ,我們有了一個 address distribution $w_t$,讀出來的內容很簡單就是
 def read(self, w):
        """ Read memory corresponding to the address weighting
        Arguments:
            w: shape = (batch_size,N)
        Outputs:
            shape = (batch_size,M)
        """
        return torch.matmul(w.unsqueeze(1), self.memory).squeeze(1)
寫入 memory 就是
def write(self, w, e, a):
        """ Erase/Add memory corresponding to the address weighting
        Arguments:
            w: shape = (batch_size,N)
            e,a: shape = (batch_size,M)
        """
        self.prev_mem = self.memory
        erase = torch.matmul(w.unsqueeze(-1), e.unsqueeze(1))
        add = torch.matmul(w.unsqueeze(-1), a.unsqueeze(1))
        self.memory = self.prev_mem * (1 - erase) + add
Address Mechanism
我覺得這部份就是 NTM 中最精華的一段了,討論了如何得到 address distribution $w_t$,所用到的概念,也是之後 attention-based model 的 motivation。
Content-based Attention
根據 memory cell 現在所紀錄的內容與 controller 的 output key vector $\mathbf{k}$ (亦即 $f$(input))做比較,決定該 memory cell 所要佔的比重 (越類似者,權重越高)。
Note: $K[u,v]$是 similarity 的 measure,一般用 cosine similarity
Location-based Attention
As title,我們從上一步中,得到了 $w_c$,但根據不同的 input ,又再多考慮這些 moemory cell 與其鄰近者的 distribution 。
Interpolation
考慮上一個時間點 address weighting 的影響
Convolution Shift
將某一位置的 memory cell 之 weighting 上,再考慮其與鄰近 memory cell 的 distribution (在此我們考慮左右各一個 memory,如果 weight 是 $(0,0,1)$ 的話,意思 就是原先該 cell 得到的所有 weight 都 apply 給其右邊的 cell)
Reweighting - Sharpening
綜合起來,整個 mechanism 是這樣運作的。
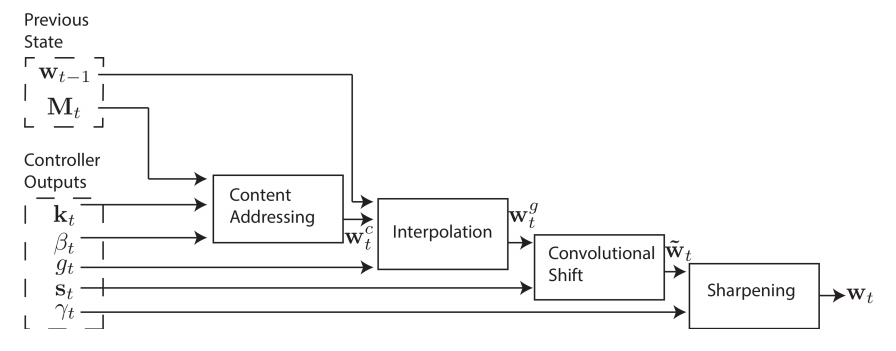
def address(self, k, beta, g, s, gamma, w_prev):
       # Content focus
       wc = self._similarity(k, beta)

       # Location focus
       wg = self._interpolate(w_prev, wc, g)
       w_hat = self._shift(wg, s)
       w = self._sharpen(w_hat, gamma)

       return w

   def _similarity(self, k, beta):
       cos_sim = F.cosine_similarity(self.memory + 1e-16, k.unsqueeze(1) + 1e-16, dim=-1)
       w = F.softmax(beta * cos_sim , dim=1)
       return w

   def _interpolate(self, w_prev, wc, g):
       return g * wc + (1 - g) * w_prev

   def _shift(self, wg, s):
       #consider 3 locations together
       conved = torch.cat([wg[:,-1:],wg,wg[:,:1]],dim=1) #pad in the beginning and end
       result = F.conv1d(conved.unsqueeze(1),s.unsqueeze(1))
       return torch.cat([result[i:i+1,i,:] for i in range(self.batch_size)])

   def _sharpen(self, w_hat, gamma):
       w = w_hat ** gamma
       w = torch.div(w, torch.sum(w, dim=1).view(-1, 1) + 1e-16)
       return w
Experiment & Discussion
相關實驗可以在 ipython notebook 找到
Copy Task
這是我隨機用長度為 3 ~ 20 的 sequence 訓練的結果,並拿長度為 30 的 sequence 當作 validation data。
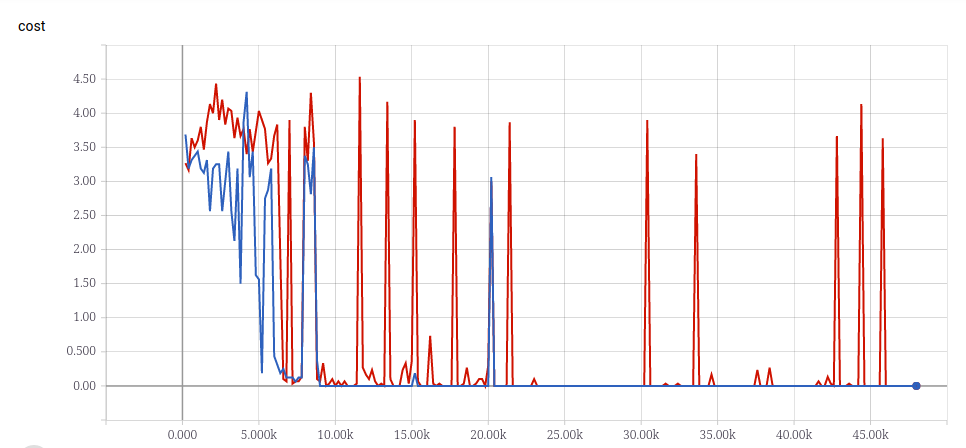
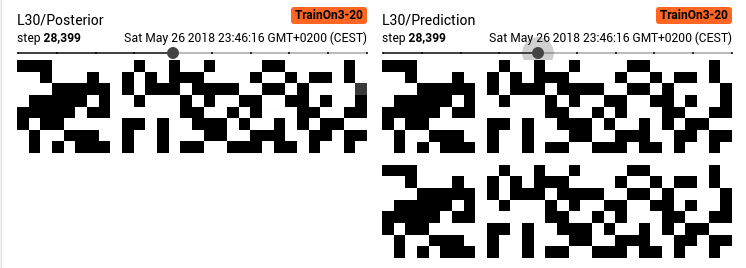
從 output 的 posterior 來看,也可以看出 model 其實蠻肯定的
一個有趣的問題是,如果用更短的 sequence 做 training 呢?\
比方說 3 ~ 10 的 sequence ,其還能夠類推到長度為 30 的 sequence 嗎?
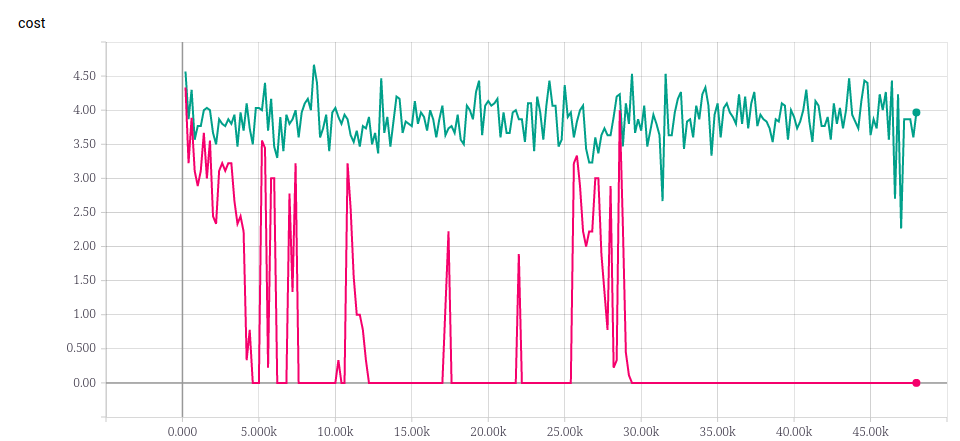
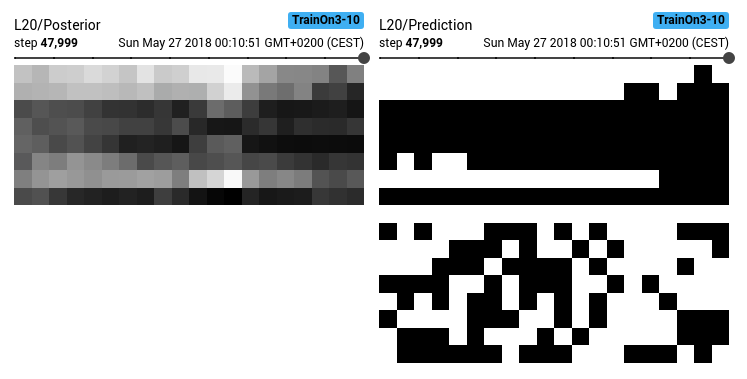
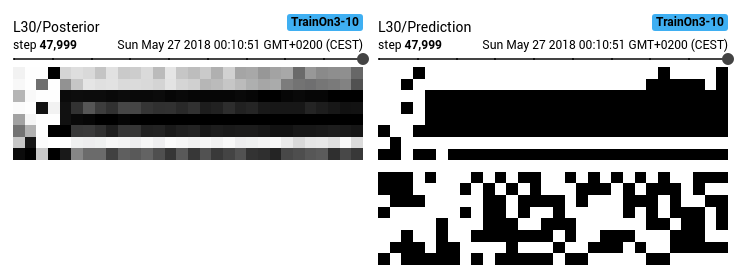
實驗結果看起來是不行😅。\
而且長度 20 的 sequence 也學不起來,這樣是否代表 NTM 沒有 generalization 的能力呢?
讓我們把 train 在 長度為 3 ~ 20 的 sequence 之 model,拿來 predict 在長度 $\geq 20$的 sequence 上。
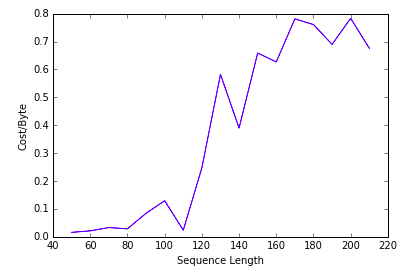
看起來它是有學到 generalization 的,\
而且對於 memory 已經不夠放的部份,也不是一口氣爛掉,還是有盡量記到一些值。
Remark: model generalization 的能力與其看過的 training data 有關,但不是簡單的線性關係而已。
Some Training Detail
- Memory 的使用及 R/W weight 變化
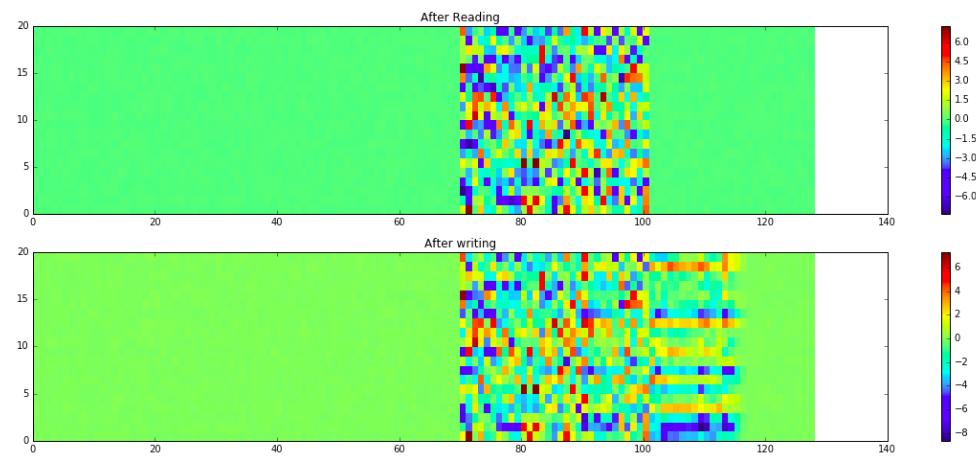
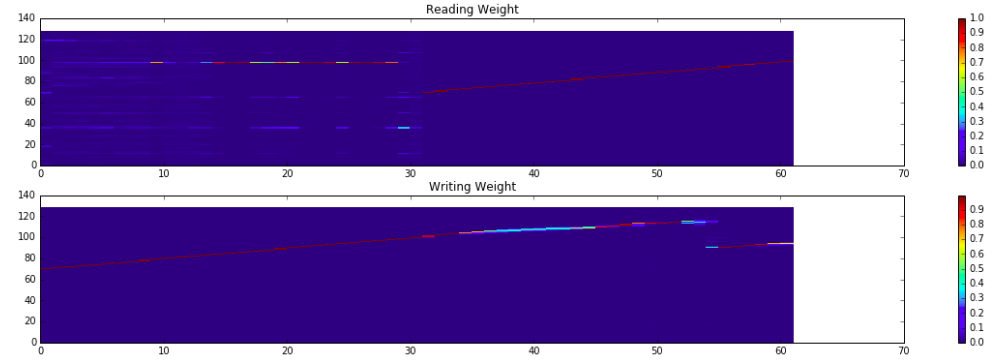
- 這裡實做的 NTM ,contoller 在輸出 final output 時,同時考慮了 read head 以及 input 的值。\
在 prediction 階段, current input 都是 dummy 的 $\mathbf{0}$ vector,但如果不考慮它的話,NTM 就無法 train 起來,推測可能是在那個 dummy vector ,對 model 而言就是僅有讀而沒有寫的指令(如同上方所提到的 R/W mode 切換)。
def forward(self,x):
       """NTM forward"""
       prev_reads,prev_ctrl_state,prev_heads_state = self.prev_state
       inp = torch.cat([x] + prev_reads,dim=1)
       ctrl_outp,ctrl_state = self.controller(inp,prev_ctrl_state)
       reads = []
       heads_state = []
       for head,prev_head_state in zip(self.heads,prev_heads_state):
           if head.is_read_head():
               r,head_state = head(ctrl_outp,prev_head_state)
               reads += [r]
           else:
               head_state = head(ctrl_outp,prev_head_state)
           heads_state += [head_state]

       # Retrieve output according to current reads
       inp2 = torch.cat([x] + reads, dim=1)
       o = F.sigmoid(self.fc(inp2)) # range: [0,1]
       self.prev_state = (reads,ctrl_state,heads_state)

       return o, self.prev_state
